IIS Hosting
Website Documentation for your KeePass client and Pleasant Password Server
Hosting with IIS (Internet Information Services) provides a full management interface to configure the network traffic to your website.
Have Questions? Contact Us
Related Topics:
- Cloud Hosting with Multiple IIS Servers
- Server Core Setup
- Configuring MS-SQL Security
- Service Config Utility
External Reference Links:
- Remote Administration for IIS Manager | Microsoft Learn
- How to Remotely Manage IIS on Windows Server Core | CoadyTech
- Redirect HTTP to HTTPS for IIS | NameCheap
Benefits of IIS Hosting
Migrating to IIS provides more features, scalability, & robustness than the lightweight IIS Express. IIS Express is a smaller, self-contained version, installed by default and starts as a task with the Pleasant Password Server service.
- Performance Improvements for concurrent users
- Robust Certificate management
- Additional Configuration Options
- Additional authentication Options:
- Client certificate authentication
- Other Authorization Rules
- Additional logging options
- etc.
Below are the migration steps, which in the future, will be replaced with a more automated solution.
Prerequisites
If PPASS is already installed skip to the migration steps.
Item 1: Copy your Application files to the IIS Machine
Do this step if you are migrating to a different machine running IIS. (Otherwise, skip to Step 2).
-
Copy the Registry entries:
- On the IIS Express machine, open the Windows registry and expand the HKEY_LOCAL_MACHINE\SOFTWARE\Pleasant Solutions, right click on it, and click Export.
- On the IIS machine locate the same same branch, right-click on it, and click Import.
-
Copy application folders from the IIS Express machine to the IIS machine:
- C:\Program Files (x86)\Pleasant Solutions
- C:\ProgramData\Pleasant Solutions\Password Server folders
- C:\Program Files (x86)\Pleasant Solutions
Item 2: Install your Application on IIS
-
Install the Application on the IIS Machine (if it is not installed already):
- Install Pleasant Password Server
- Stop the "Pleasant Password Server" service
- Disable the "Pleasant Password Server" service
- Stopping/Disabling this service is stopping the IIS Express service which we will be replacing with the IIS site.
Migration Steps From IIS Express to IIS
Time Estimated: 30 minutes / 1 hour
Continue on from the steps from Prerequisites Section...
Step 3: Enable IIS Feature
If IIS is already installed and visible in the Server Manager, then skip to step 4.
- Enable IIS feature, if it's not already:
-
Open Control Panel > Server Manager and enable IIS feature.
-
Step 4: Add IIS Features
-
Add 3 features
-
Open the Server Manager > "Add Roles and Features" Wizard: Server Roles > Web Server (IIS) > Web Server > Application Development (click add features):
- IIS: Application Initialization
-
For IIS version 7.5: install the Application Initialization module (separate download)
-
- IIS: ASP.NET 4.5, 4.6, or 4.7
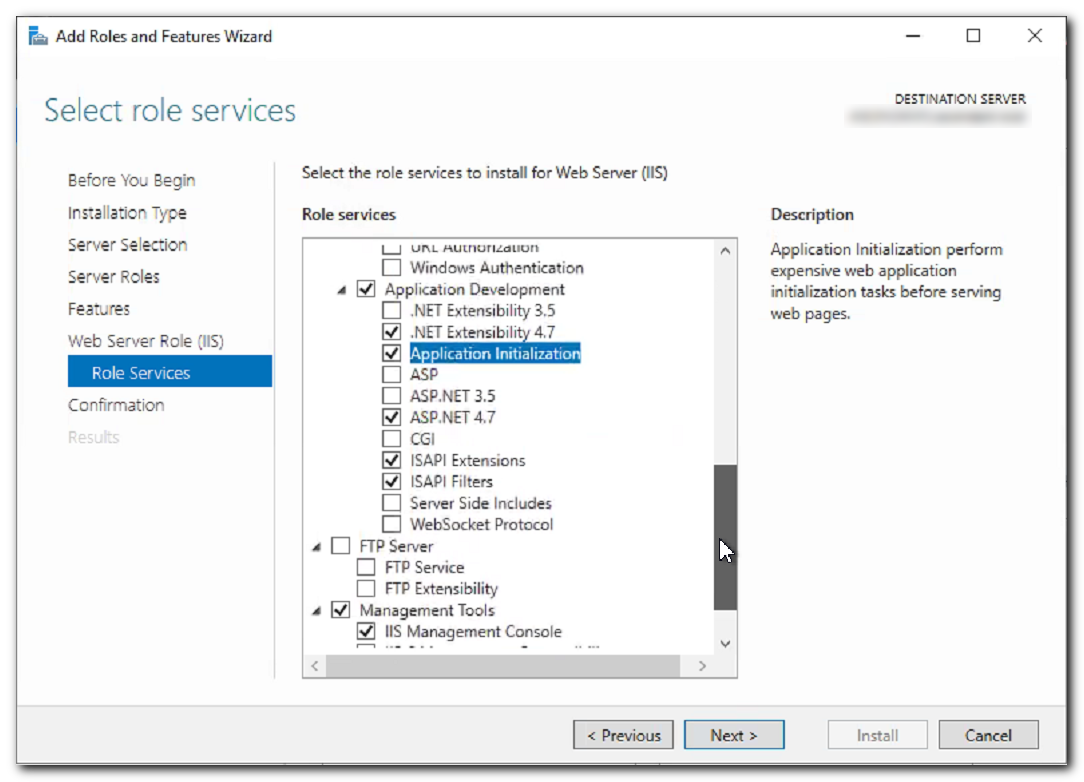
- IIS: Application Initialization
-
Next download and install this feature:
- URL Rewrite
- Download URL Rewrite and install file from:
- https://www.iis.net/downloads/microsoft/url-rewrite
- e.g. rewrite_amd64_en-US.msi
- URL Rewrite
-
Step 5: Create a New IIS Site
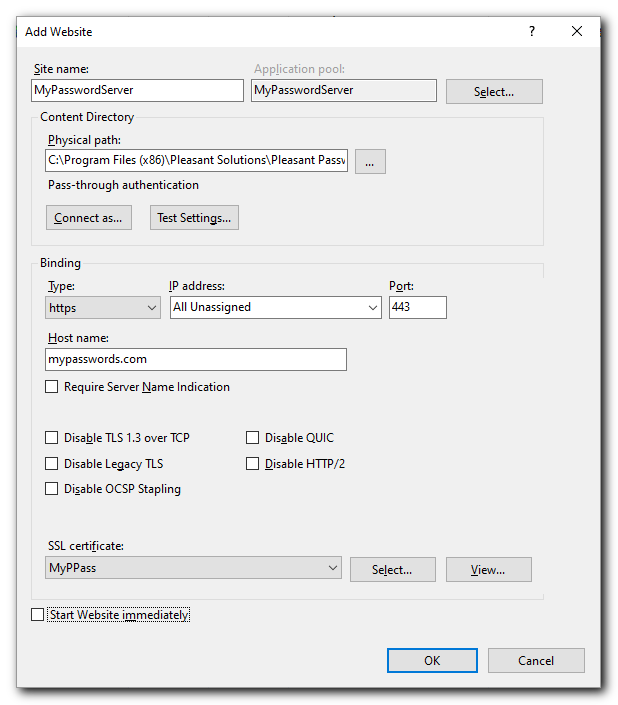
- Select Sites > Add Website
- Site name is for your own management
- In the IIS Manager, create the new site and set the Physical path to:
- C:\Program Files (x86)\Pleasant Solutions\Pleasant Password Server\www
- Bind the site to type HTTPS
- May choose to use a non-standard port such as 10001 (443 is also acceptable but be sure to match it in your service config), to limit traffic flowing to Password Server
- Host name: Should be FQDN
- Choose a SSL Certificate (needs to be uploaded to Pleasant Configuration Utility - we can use the placeholder if we aren't ready for this yet.)
- Ensure "start website immediately" is unchecked
- NOTE:
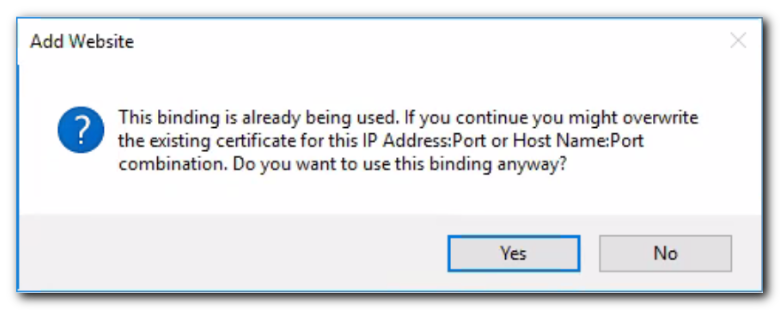
- When switching from IIS Express service to our new IIS site, using the same hostname as in IIS Express will bring down the IIS Express site.
- So alternatively we can first set a new hostname and then change it back when we are finally ready to make the switch-over.
Step 6: Configure the IIS Site
-
For the IIS site:
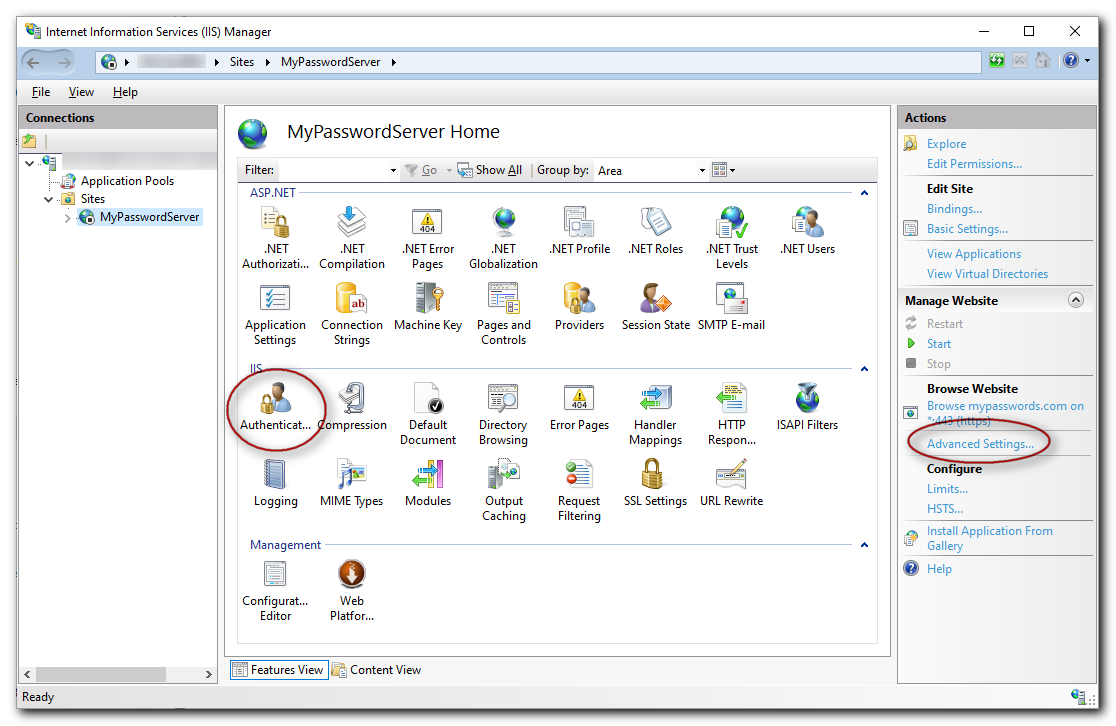
- Click on the IIS website > Look on the right-hand side panel for:
- Advanced Settings > (General) >
- Set Preload Enabled = True
- Click Ok
- Click on the IIS website > Look on the right-hand side panel for:
-
Now on the homepage on the left of the IIS console:
- Click the IIS "Authentication" icon
- For versions >= 7.9.0: Set ASP.NET Impersonation = Disabled
- For versions < 7.9.0: Set ASP.NET Impersonation = Enabled
- For versions >= 7.9.0: Set ASP.NET Impersonation = Disabled
- Click the IIS "Authentication" icon
Step 7: Configure the IIS Application Pool User
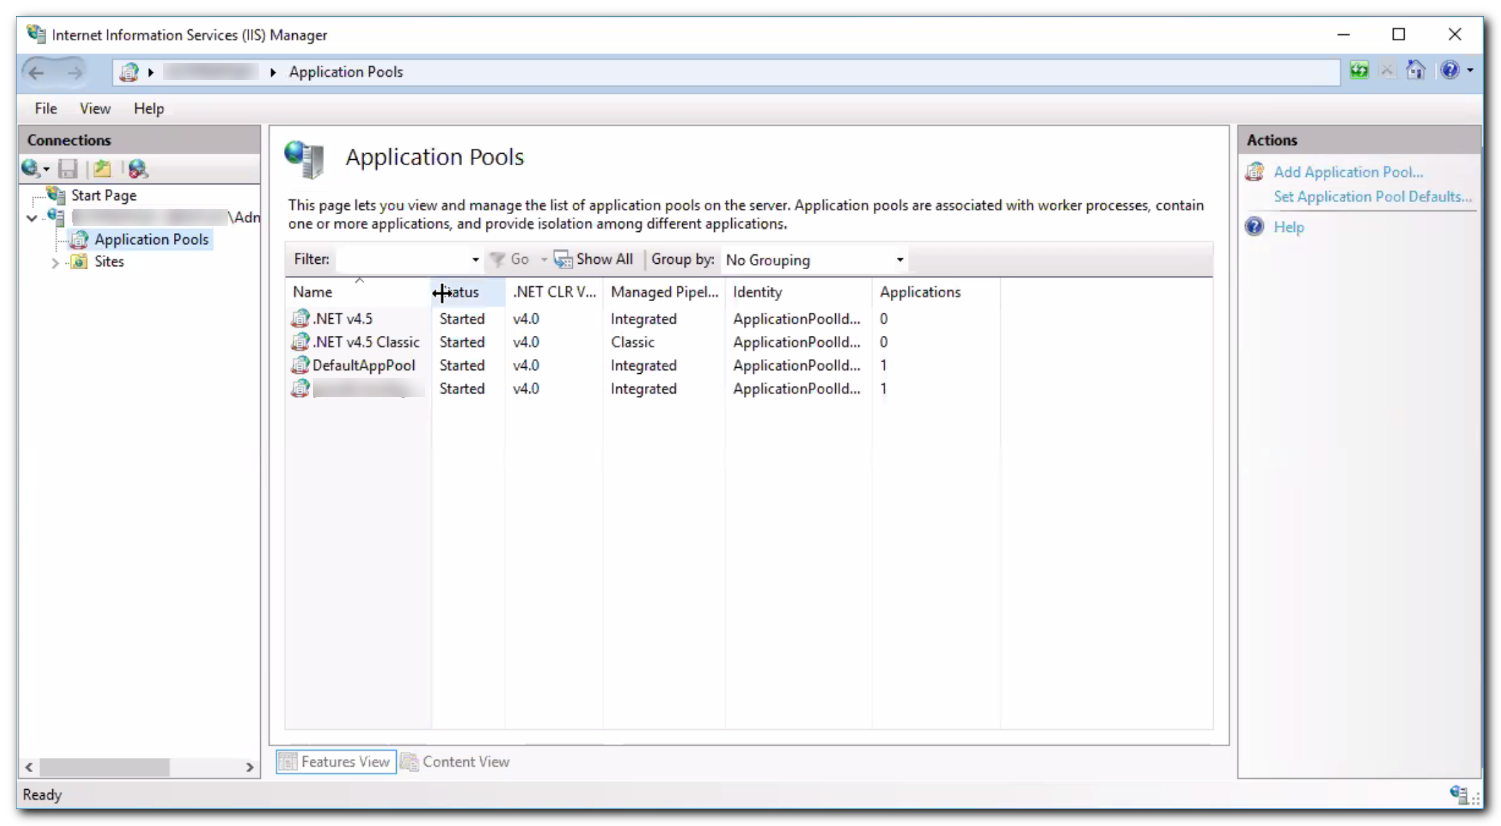
- Select Application Pools under the homepage on the left of IIS console
-
Configure the account used for Password Server's "Application Pool"
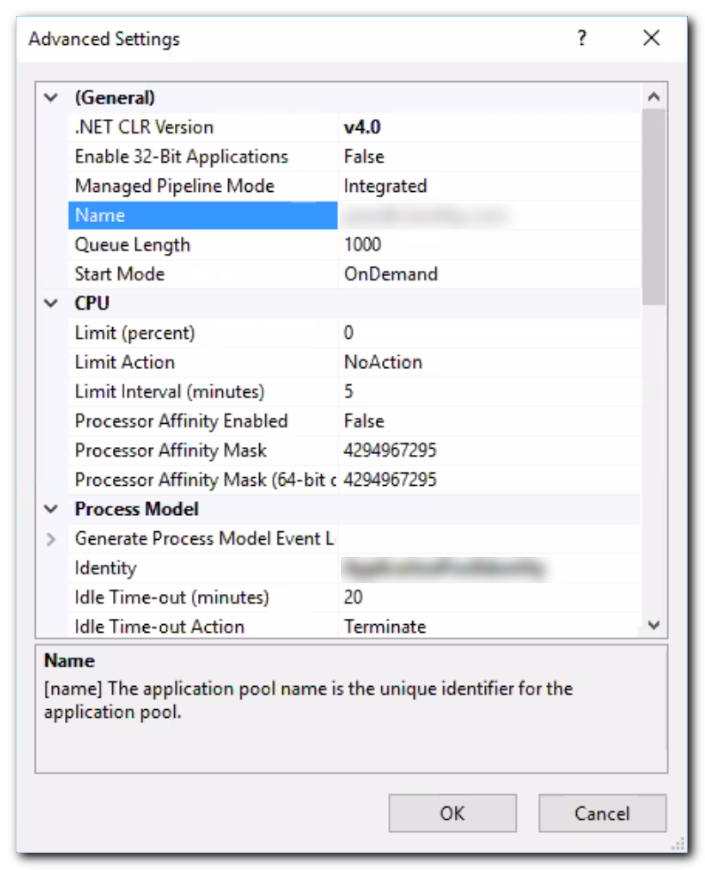
- Right-click on the Application Pool > Select "Advanced Settings" > Click Identity
- Choose one of the following options:
- Option A: LocalSystem (easiest)
- Option B: Service Account (recommended)
- Option C: ApplicationPoolIdentity (advanced)
- Choose one of the following options:
- Right-click on the Application Pool > Select "Advanced Settings" > Click Identity
- Stay in the App Pool window and continue to step 7
Option A - LocalSystem (Easiest)
- Uses the account which is the most powerful on the machine, with access privileges across the network
Option B - Service Account (Recommended)
- A service account with Local Admin access (a local account or AD/LDAP account).
Option C - ApplicationPoolIdentity (Very Difficult Setup Steps)
Choosing this route will likely entail more challenging setup steps of account permissions.
- Use a separate, unique Application Pool Identity
- Explanation: This creates a new, virtual account to secure the application and it's communications in IIS an across the network with a custom, least privileged account (such as NetworkService). Rather than creating a new account for each application, this account will allow both: running in it's own space and connection to other network locations (e.g. Backup, and MS-SQL).
- Set Identity = ApplicationPoolIdentity
-
Your new virtual user account can be referenced by this handle:
- IIS APPPOOL\<YourApplicationPoolName>
- This user will not be found by searching in your machine/network users
- This user is only selected by referencing the "IIS APPPOOL\" location, indexed by the name of your application pool
-
(Note: in the next step 7, be sure to set Load User Profile = True)
Step 8: Configure the IIS Application Pool Settings
-
Application Pool > Select the application pool > Advanced Settings:
- (General) > Start Mode = AlwaysRunning
- Keep the website running
- Process Model > Idle Time-out (minutes) = 0
- Stop the website's App Pool from shutting down if it has been idle for awhile (after 20 minutes)
- Process Model > Maximum Worker Processes = 0
- Allow numerous processes at a time
- * Process Model > Load User Profile = True
- * Only needed if you are:
- Using a Service Account or ApplicationPoolIdentity user, OR,
- Seeing IsolatedStorage errors in server Logging Details
- * Only needed if you are:
- (General) > Start Mode = AlwaysRunning
Step 9: Configure the User Account Permissions
-
Configure access on this Machine:
- If you have chosen a Local Admin account or LocalSystem:
-
Your account will have the permissions needed on this machine
-
-
Otherwise, provide access:
-
If using the ApplicationPoolIdentity, see how to reference this user in Step 6, Option A.
-
File Folders:
-
Give the account "modify" rights on these folders:
- C:\Program Files (x86)\Pleasant Solutions
- C:\ProgramData\Pleasant Solutions\Password Server
-
-
Registry Keys:
-
1) For each of the following folders, give the account "Full Control" rights for both of these registry folders:
- HKEY_LOCAL_MACHINE\SOFTWARE\Pleasant Solutions
- HKEY_LOCAL_MACHINE\SOFTWARE\Pleasant Solutions\PasswordManager
- HKEY_LOCAL_MACHINE\SOFTWARE\Pleasant Solutions
-
2) Right-Click the folder > select Permissions... > select the Group or username > Advanced > Permissions tab
- Select the Group or username > Click Add or View button
- Type: Allow
- Applies to: This key and subkeys (Replaces all child object permissions)
- Must remove the permission "Write DAC" - without this the permissions will be reset at restart.
- Select the Group or username > Click Add or View button
-
-
- If you have chosen a Local Admin account or LocalSystem:
-
Configure Network Access:
-
This account may need access for the following connections:
- Network Backups: if your Pleasant Password application automatic Backups are placed on a network share
- MS SQL Server Database: give this same user (selected in step 6) access to your database instance
-
(Note: If using the ApplicationPoolIdentity, see how to reference this user in Step 6, Option A.)
-
Step 10: Start the IIS site
- If you have not done so, Stop the "Pleasant Password Server" service
-
Disable the "Pleasant Password Server" service
-
- Select Application Pool > Select site
-
Recycle the Application Pool
-
- The site will now appear under "sites" in the IIS console on the left
-
Click to Start the site (from the right-hand side panel)
-
- If necessary, reboot the server and restart IIS
Please Contact Us! If you have any questions or any difficulties regarding these steps.
Troubleshooting
- If the site does not start or you notice errors:
-
Check for error details in Windows Event Logs, or temporarily increase the IIS webpage error 500 details (see below for more info).
-
Increase the Server Logging Details, and check logging activity.
-
-
If you see "Requested registry access is not allowed"
- Ensure that the "PasswordManager" registry folder is set as mentioned in step 9.
- There is an issue with permissions. Switch to using either: a Service account user with local admin on the server, or to the LocalSystem user.
- Contact us and let us help resolve the issue.
- If you see an error accessing Web.config file:
-
There could be a couple potential problems:
- 1) The Application Pool user (for this website) may not have the file folder permissions to access the web.config file.
- - We would encourage using a User Service Account with local admin privileges to this machine, or the LocalSystem user.
- - You may need to give the process running your web app the permissions explained in Step 6.
- - Some customers are expressed difficulty using the "ApplicationPoolIdentity" virtual user, which are looking into
-
2) If one of the necessary IIS Features has not been installed (explained in step 3):
- URL Rewrite module
- IIS: ASP.NET -
3) If you still have issues, please contact us.
- 1) The Application Pool user (for this website) may not have the file folder permissions to access the web.config file.
-
-
If you receive an "IsolatedStorage" error:
- Consider upgrading to the most recent stable or higher which better handles this.
- Set "Load User Profile" = True (step 7)
-
If you receive a "Method Not Allowed" error, when modifying an entry in KeePass for Pleasant client:
- Remove the WebDAV feature from IIS, and reboot the server
- Open Control Panel > All Control Panel Items > Programs and Features > Select Turn Windows features on or off
- Uncheck the WebDAV feature:
- Internet Information Services > World Wide Web Services > Common HTTP Features
- Reboot and restart IIS server
- Double check settings in step 6 as this reboot can sometimes affect this setup
- Remove the WebDAV feature from IIS, and reboot the server
-
If you notice the Application Pool starts and immediately stops:
- Re-Enter the credentials
- Check the Server Logging Details
-
If you see an 500 error in your browser,
- View this HTTP Error Codes for IIS page and lookup the 0x800 error code: eg. 0x8007000d
- Check that the 3 features listed at the start may are added:
- in particular IIS: ASP.NET
- URL Rewrite 2.1 may need to be re-installed
- Check for additional Logging detail errors or the windows Event logs.
Increasing Error 500 details:
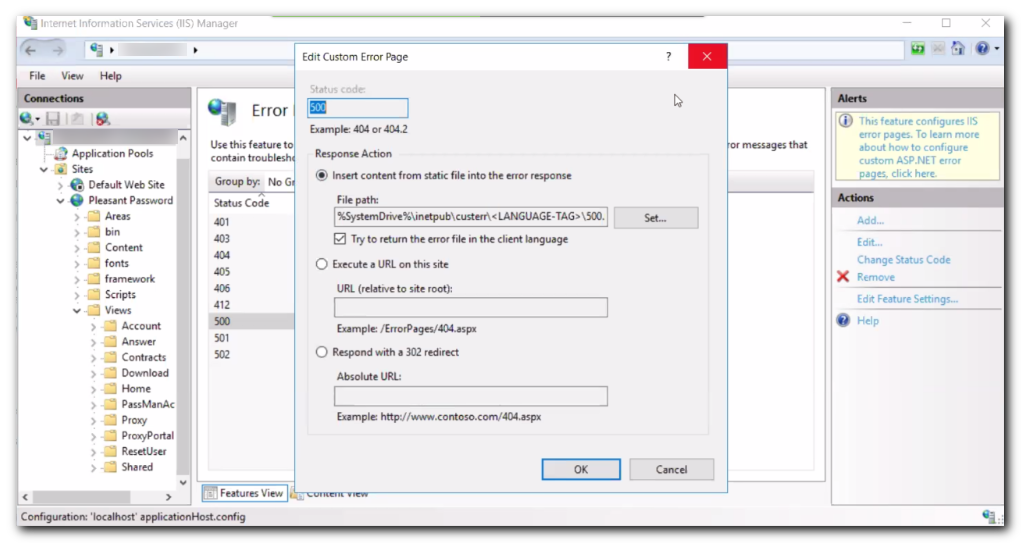
If you are receiving an error 500 or 400 you can increase the details by following these steps:
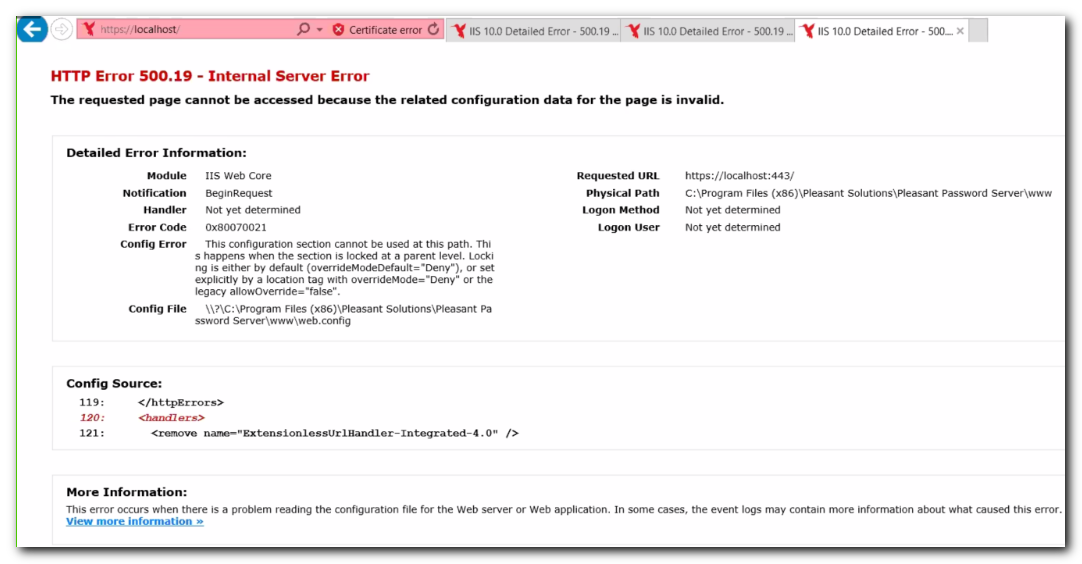
Open the error pages:
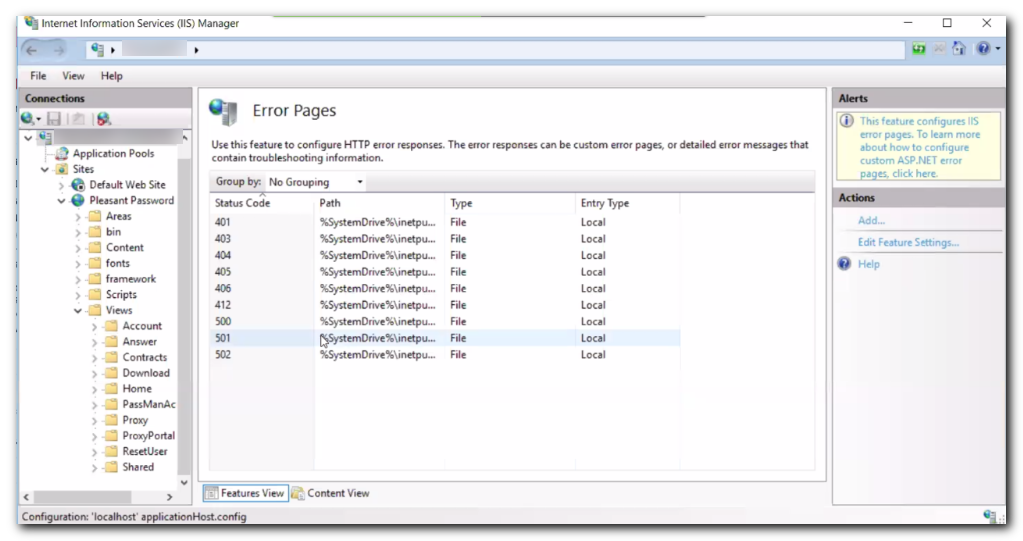
Edit the custom error page
