
Create a Self-Signed Certificate with PowerShell
Share KeePass Passwords with your Team of multiple users
Certificates are are an integral part of security as they help to establish trusted connections.
By following these steps below, you can configure a trusted connection to your server using Self-Signed certificates.
Background information: When hosting software, a valid certificate enables encrypted connections to browsers and other software clients.
- We usually recommend using a purchased 3rd-party certificate from a Trusted Certificate Authority. However in some cases they are required (e.g. for use with Azure) or useful for testing / internal use.
- You can follow these technical steps to create your own Self-Signed Certificate.
Other alternatives:
- Purchase a 3rd-party certificate from a Trusted Certificate Authority
- Create a certificate using IIS (requires IIS Hosting)
- Use your internal Certificate Authority process.
- Use a Certificate Authority like Let's Encrypt, which provides free certificates.
- Azure now provides free certificates.
Related topic:
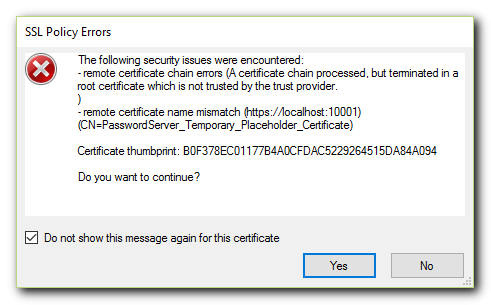
How to Mitigate Certificate Warning Messages
When first connecting KeePass to a new server, you will receive a warning message that a valid certificate has not been set up yet.
Overview Server Machine:
Overview Client Machine:
Create a Self-Signed Certificate and Certificate Authority (CA)
If installing on Windows Server 2012 R2, then use an alternate method to create the self-signed certificate.
The following PowerShell commands and instructions will create a Root Certificate and a Self-Signed Certificate, valid for 10 years, and 350 days respectively and will place them in the Certificate Store on the local machine.
Run the Command Prompt by typing "cmd" in the Windows search bar and right click and choose "Run as administrator."

PowerShell Commands to Create Certificates
Enter PowerShell:
- Type "PowerShell" in the command prompt window (or open the PowerShell ISE)

Step 1. Create a Certificate Authority (CA).
Run the following command in PowerShell (or copy paste the following script and hit enter).
- Replace the generic name "MyRootCA" with a name of your choice:
# Create root certificate

$rootCA = New-SelfSignedCertificate -Subject "CN=MyRootCA,O=My Company, Inc,OU=https://MyWebsite.com" `
-CertStoreLocation "cert:\LocalMachine\My" `
-KeyExportPolicy Exportable `
-KeyUsage CertSign,CRLSign,DigitalSignature `
-KeyLength 4096 `
-KeyUsageProperty All `
-KeyAlgorithm 'RSA' `
-HashAlgorithm 'SHA256' `
-Provider "Microsoft Enhanced RSA and AES Cryptographic Provider" `
-NotAfter (Get-Date).AddYears(10)
Step 2. Now create a Self-Signed Certificate for your site.
Run the following command. The name should be the same URL address that your users will use to connect, e.g. in their website browser URL or KeePass server URL.
- Replace "MyPPassSite.org" (both places) with the site URL:
- e.g. "CN=ppass.domain.org", OR,
- e.g. "CN=*.domain.org"
# Create site certificate
$siteCert = New-SelfSignedCertificate -Subject "CN=MyPPassSite.org" `
-Signer $rootCA `
-KeyLength 2048 `
-CertStoreLocation "cert:\LocalMachine\My" `
-KeyExportPolicy Exportable `
-KeyUsage DigitalSignature,KeyEncipherment `
-DnsName MyPPassSite.org `
-KeyAlgorithm 'RSA' `
-HashAlgorithm 'SHA256' `
-Provider "Microsoft Enhanced RSA and AES Cryptographic Provider" `
-NotAfter (Get-Date).AddDays(350)
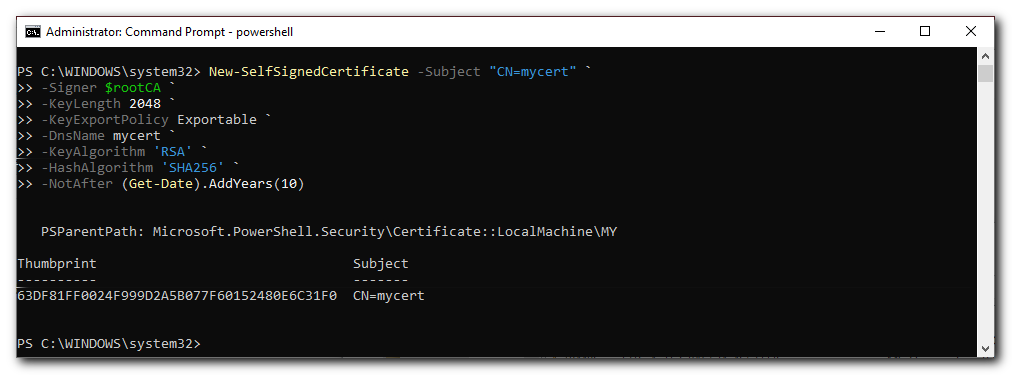
# Display certificate details with Thumbprint
$siteCert
This will also print out the certificate details. Save this Thumbprint value for a future step.
Step 3. Export the certificates.
When the certificates were created, they were automatically imported into the Certificate Store into the Personal folder. We want to save these for the purposes of distributing them to other machines, and also optionally for other purposes (in a secure location).
Run the following commands to export the certificates to the current folder.
- The .pfx files contain private keys and should be kept only in secure locations.
- The root .cer certifcate (without private keys) can be distributed to other machines in your network.
# Export Root Certificate to .pfx and .cer files
$CertPassword = ConvertTo-SecureString -String "YourPassword" -Force –AsPlainText
Export-PfxCertificate -Cert $rootCA -FilePath ".\MyRootCA.pfx" -Password $CertPassword
Export-Certificate -Cert $rootCA -FilePath ".\MyRootCA.cer"
# Export Site Certificate to .pfx and .cer files
$siteCertPwd = ConvertTo-SecureString -String "YourPassword" -Force -AsPlainText
Export-PfxCertificate -Cert $siteCert -FilePath ".\SiteCert.pfx" -Password $siteCertPwd
Export-Certificate -Cert $siteCert -FilePath ".\SiteCert.cer"
Step 4. Import the certificates to the Trusted folder locations in the Cert store.
Now that the certificates are in the store, we can also ensure that they are also imported into the trusted folders in the certificate folders. The Root Certificate can be moved/imported to "Trusted Root" (local machine) and the Site Certificate to "Trusted People" (current user/local machine certificate store).
Run these import commands on the server machine(s) to trust the certificates:
Import-Certificate -CertStoreLocation cert:\CurrentUser\TrustedPeople -FilePath ".\SiteCert.cer"
Import-Certificate -CertStoreLocation cert:\LocalMachine\AuthRoot -FilePath ".\MyRootCA.cer"
Optionally, after running these commands, we can now remove the Root Certificate from the Personal folder, since it is now re-located to the Trust Root folder.
Step 5. Configure Password Server to use the new site certificate.
- Note: if you are using IIS, you will also need to import the certificate into IIS - in the website site bindings.
First, replace these values:
- "MyPPassSite.org", replace with your site certificate name (CN name)
- "63DF81FF0024F...", replace with the resulting Thumbprint value (step 2)
Then run the commands in PowerShell.
Restart the service/site.
Set-ItemProperty "HKLM:\Software\Pleasant Solutions\PasswordManager" -Name CertificateName -Value "MyPPassSite.org"
Set-ItemProperty "HKLM:\Software\Pleasant Solutions\PasswordManager" -Name ThumbPrint -Value "63DF81FF0024F999D2A5B077F6152480E6C31F0"
Step 6. Distribute the public certificates (.cer) to machines that will connect to this site.
There are multiple methods of distributing these certificates to other machines.
A) Group Policy - the easiest and most common way to distribute certificates across all machines in an Active Directory environment, is by using Group Policy:
B) Manually - run the import commands on the machine(s):
Import-Certificate -CertStoreLocation cert:\CurrentUser\TrustedPeople -FilePath ".\SiteCert.cer"
Import-Certificate -CertStoreLocation cert:\LocalMachine\AuthRoot -FilePath ".\MyRootCA.cer"
Export the CA and Self-Signed Certificate
To manually export certificates, run the certificate manager as administrator by entering certlm.msc in the windows search bar and choosing "Run as administrator."

Expand both the "Personal" and "Trusted Root Certification" directories. In the Personal Certificates folder, you will find both the CA and the Self-Signed Certificate that we created in the previous steps.
Drag and drop the CA file "MyRootCA" from the "Personal Certificates" directory into the Trusted Root Certification Certificate directory.

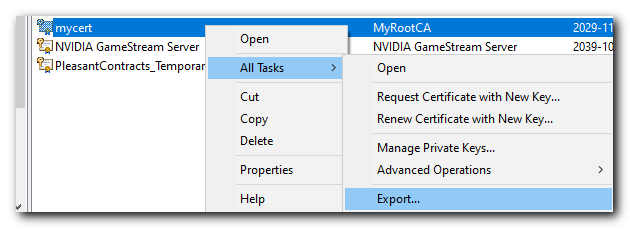
Next we will right-click the Self-Signed Certificate file "mycert" and choose All Tasks > Export
Click Next then select "Yes, export the private key". This key should be stored securely.
- Select "Personal Information Exchange - PKCS #12 (.PFX)
- Ensure both "Include all certificates in the certification path if possible" and
- "Enable certificate privacy" are both checked before clicking Next once again.
You can also export again without the private key to a .cer file, which file can be distributed to other machines.

Then enter a password to protect your certificate and set the encryption to AES256-SHA256 and click next.

Then give the exported certificate a meaningful name. Click Next.
Then we will be at the final review page and click Finish.

Import the Self-Signed Certificate
Next we will run the Pleasant Password Server Service Configuration utility by typing "Service" in the windows search bar.

Once the Service Configuration utility opens click the "Certificate Configuration" button, then click "Import Certificate." You will be able to find the recently created self-signed certificate that we just exported in the C:\Windows\System32 directory then select the file.
Restart Pleasant Password Service
In the windows search bar type "Services" to run the windows services utility. Find the Pleasant Password Server service and click Restart.

Congratulations! You now have a trusted certificate!
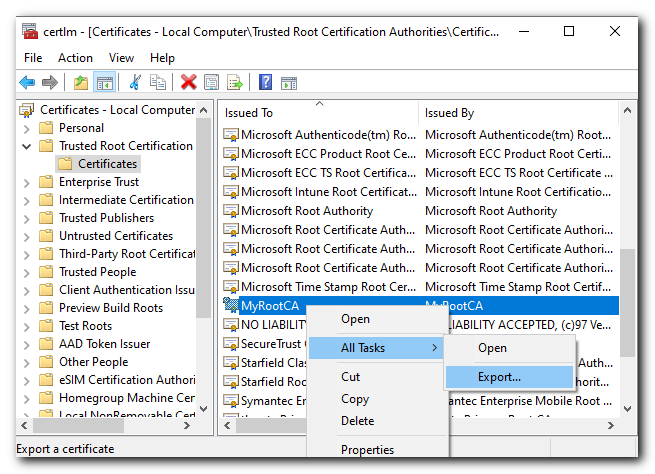
Export the Trusted Root CA
Return back to the Certificate store and export the Trusted Root CA we created earlier and moved to the "Trusted Root Certification" Certificate directory
Click Next then select "No, do not export the private key"
- Select "Base-64 encoded X.509 (CER)" and click Next
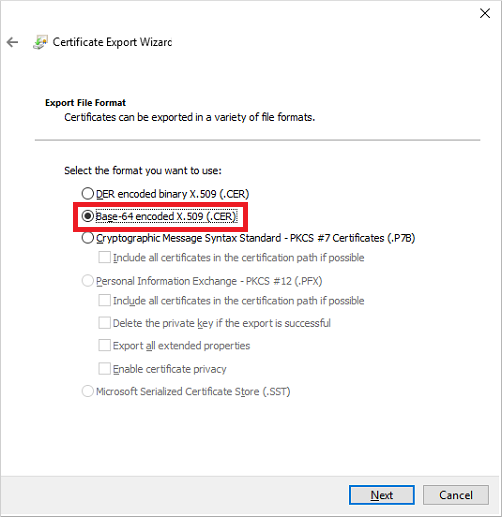
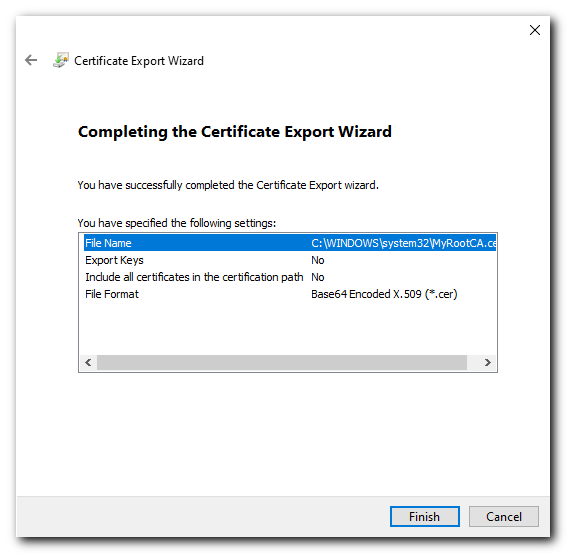
Give the exported file a name (could give it the same name to keep it simple) click Next and then review the details and click Finish.
Import the Trusted Root CA into Client Machines
This step will need to be repeated on every client machine that connects to the server.
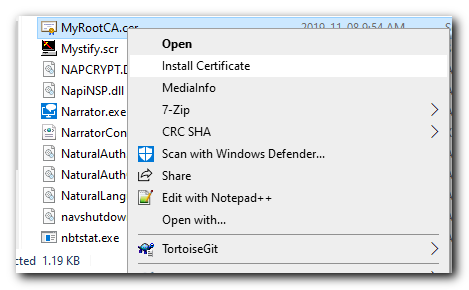
You will be able to find the recently created Trusted Root CA file that we just exported in the C:\Windows\System32 directory then select the file.
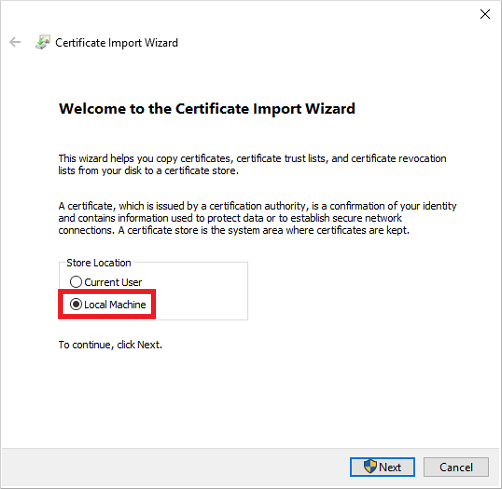
Copy the file we just exported to the client machine. Then Right click the certificate file and select "Install Certificate"
Then run choose Local machine
Select the "Place all certificates in the following store" radio button and click Browse...
And select the "Trusted Root Certification Authorities" and click next.
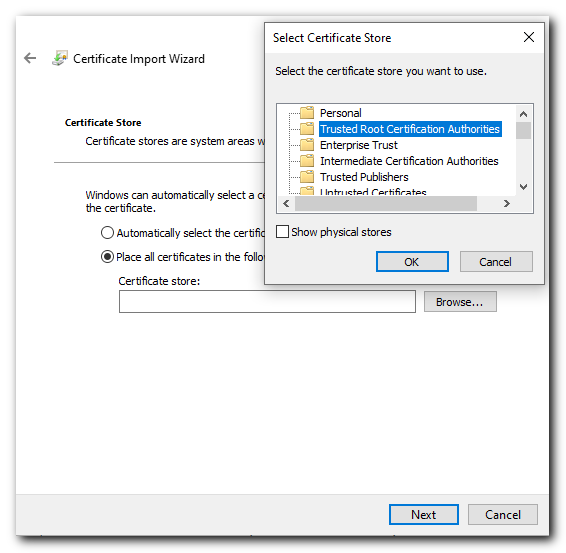
Review the action and click Finish.
Congratulations! Now your client machine will trust your self signed certificate!
Installing on Windows 7 Client Machine
The only major difference with Windows 7 is how we access the certificate store.
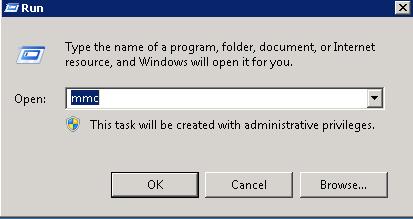
Click Start -> Run -> Enter 'MMC' and click 'OK'
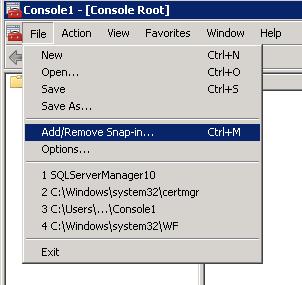
Click File > Add/Remove Snap-In
Locate "Certificates" on the left and click "Add"
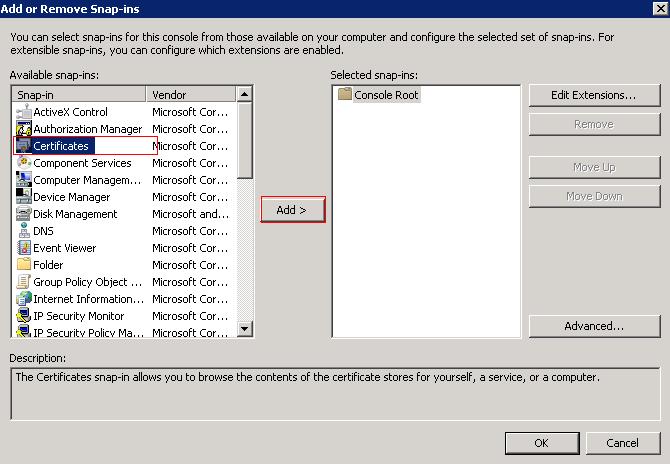
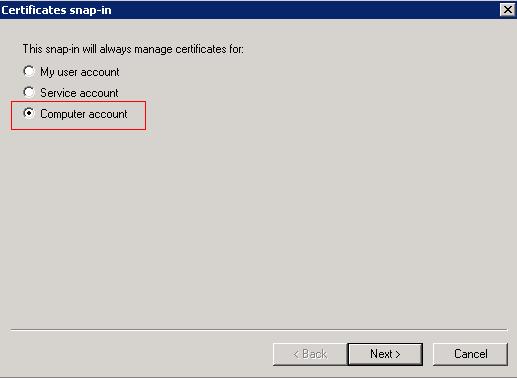
Select "Computer Account" radio button and click next.
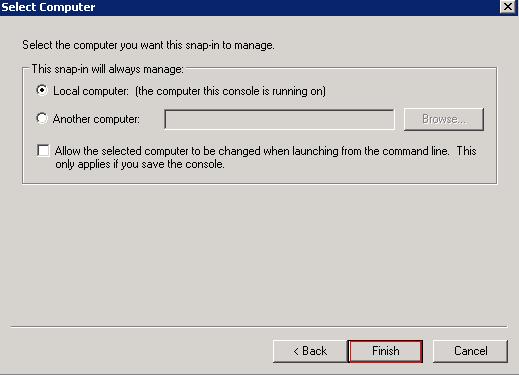
Ensure the "Local Computer" radio button is selected and click Finish
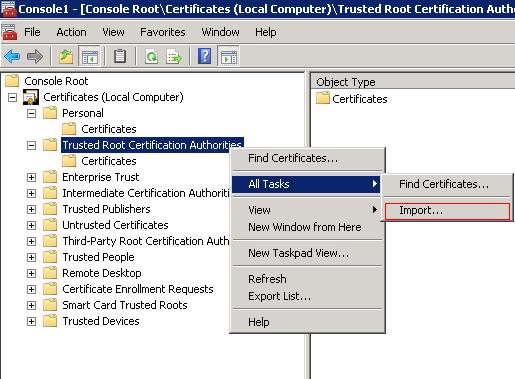
Then select Ok which will open the Console1 window. Right Click the "Trusted Root Certification Authorities" and choose All Tasks > Import.
From here the instructions are the same as for Windows 10.
Problems?
-
Double-Check Service startup
- If Hosting with IIS, remember to stop and disable the service.
-
Contact Support with your specific configuration and a description of the problem you are having.